Up until a few days ago, I had only used my Yubikey sparingly as a 2FA device for things like my Google account. However, I had always been interested in using it for SSH access to the numerous boxes I log into on a regular basis.
Yubico has some existing tutorials that I felt were a bit unclear at times so I've decided to write a simple step by step guide, and help prevent some issues I ran into along the way.
As a general note, I've used a Yubikey 4 for this, and it supports keys up to 4096 bits in size, whereas some of the other Yubikeys only support 2048, so keep that in mind.
Prerequisites
- Install the latest version of Gpg4Win - I'm using 3.1.2 on Windows 10
- If you use Cygwin for SSH:
- Do not install the gnupg packages in Cygwin. Make sure you are using the ones that game with Gpg4Win.
- Install the ssh-pageant package.
- If you use PuTTy for SSH, you don't need to do anything special.
- A Yubikey with OpenPGP support - Yubikey 4/4C (and nano variants), NEO and NEO-n.
Step 1 - Making sure gpg is talking to your Yubikey
This was one of the most painful parts of the entire process due to the environment that I am working with. However, this has also caused issues for many other people. In general, you will want to check the following:
-
Does your system have any form of smartcard reader, card slot or contactless (NFC) based? If so, I'll have a special configuration option for you in Gpg4Win's Kleopatra :)
-
Have you installed any Yubikey drivers? If so, I recommend you uninstall them as I read numerous accounts that it seemed to interfere with OpenPGP operations.
First things first, let's try and see if the Yubikey shows up in Kleopatra right away. With your Yubikey plugged in, open Kleopatra and navigate to Tools and select Manage Smartcards. If you are lucky, you will see something like the following image:
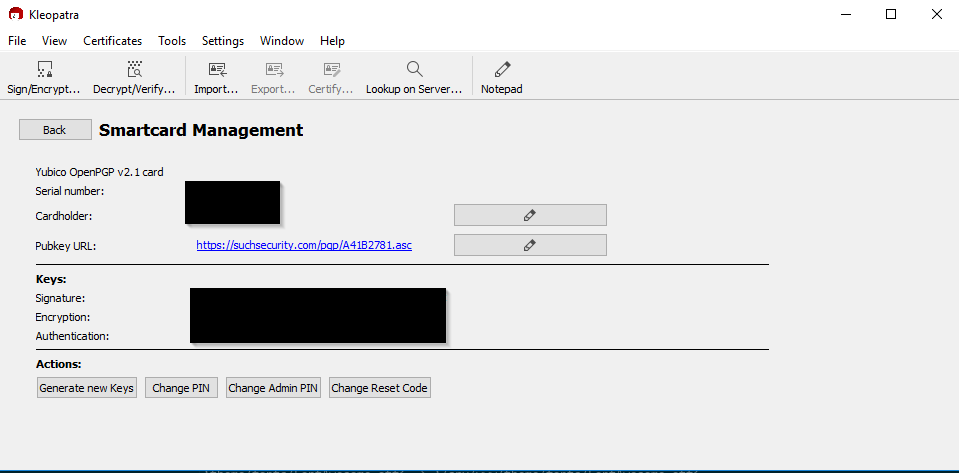
If this is what you see, skip ahead to Step 2.
What if you don't see something like this, even after hitting F5 to refresh? If you have another smartcard reader, or if you are not sure if that may be the case, check the output of certutil -scinfo. This is what my output on a Dell Latitude looked like:
The Microsoft Smart Card Resource Manager is running.
Current reader/card status:
Readers: 3
  0: Broadcom Corp Contacted SmartCard 0
  1: Broadcom Corp Contactless SmartCard 0
  2: Yubico Yubikey 4 OTP+U2F+CCID 0
--- Reader: Broadcom Corp Contacted SmartCard 0
--- Status: SCARD_STATE_EMPTY
--- Status: No card.
---   Card:
--- Reader: Broadcom Corp Contactless SmartCard 0
--- Status: SCARD_STATE_EMPTY
--- Status: No card.
---   Card:
--- Reader: Yubico Yubikey 4 OTP+U2F+CCID 0
--- Status: SCARD_STATE_PRESENT | SCARD_STATE_EXCLUSIVE | SCARD_STATE_INUSE
--- Status: Card is in use exclusively by another process.
---   Card: Identity Device (NIST SP 800-73 [PIV])
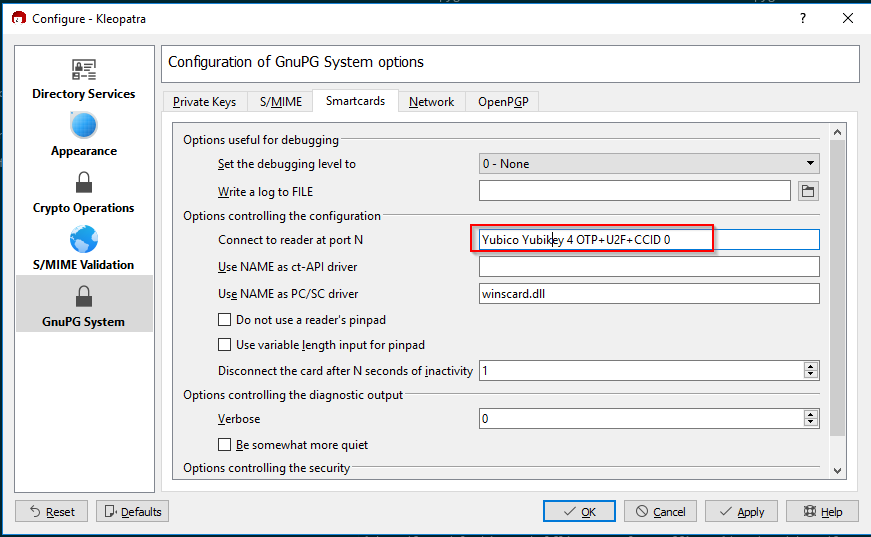
Note that I have a total of 3 smartcard readers, with the Yubikey counting as its own reader. In order to deal with this, gpg-connect-agent has to be told (via Kleopatra) that we want to explicitly use the Yubikey reader. Navigate to Settings then Configure Kleopatra and go to the GnuPG system section and select the Smartcards tab. Now, take the exact description of your Yubikey that you got from certutil -scinfo and paste it into the Connect to reader at port N setting. You should wind up with something like this:
Great! So now, what if it still doesn't show up? We'll need to edit a config file, as there seems to be some sort of conflict accessing the Yubikey that can be remedied with a small gpg config tweak. Navigate to \Users\<username>\AppData\Roaming\gnupg\ and open up scdaemon.conf in your favorite text editor. Add the following line, above the last "GPGConf" line:
card-timeout 1
My resulting scdaemon.conf looks like this:
###+++--- GPGConf ---+++###
reader-port Yubico Yubikey 4 OTP+U2F+CCID 0
card-timeout 1
###+++--- GPGConf ---+++### 08/30/18 15:12:25 Eastern Daylight Time
# GPGConf edited this configuration file.
# It will disable options before this marked block, but it will
# never change anything below these lines.
Exit Kleopatra, and make sure you kill gpg-agent and/or gpg-connect-agent if the processes stick around. Start Kleopatra back up, and hopefully fingers crossed you now have your Yubikey showing up in Kleopatra.
You can also check info using the gpg command line:
gpg --card-status
which will show you something like this if successful:
Reader ...........: Yubico Yubikey 4 OTP U2F CCID 0
Application ID ...: XXXXXXXXXXXXXXXXXXXXXXXXXXXXXXXXXX
Version ..........: 2.1
Manufacturer .....: Yubico
Serial number ....: 000000000
Name of cardholder: Thracky Spackoid
Language prefs ...: [not set]
Sex ..............: unspecified
URL of public key : https://suchsecurity.com/pgp/A41B2781.asc
Login data .......: thracky
Signature PIN ....: forced
Key attributes ...: rsa2048 rsa4096 rsa2048
Max. PIN lengths .: 127 127 127
PIN retry counter : 3 0 3
Step 2 - GPG keys
OpenPGP keys have 3 components: a master key, subkeys, and user ID(s). The private portion of the master key proves that you are the owner and have authority over creation and revocation of subkeys.
The master key
The GPG master key will be used use to generate subkeys that will go on the Yubikey. I already have a GPG master key which I use with Keybase, so I simply exported it to a standard PGP format and imported to GPG with the following command:
keybase pgp export -s | gpg --allow-secret-key-import --import -
If you do not already have a master key, please follow this next section to generate one.
Generating a master key
In theory you can do this directly on the Yubikey, but if you ever lose your Yubikey you are SOL so I don't recommend this.
Much of this comes from Eric Severance's blog post about PGP and SSH keys on a Yubikey NEO as it provides a good starting point for getting everything going with a new master key. I don't personally think everything he does is 100% necessary but I will follow a few of his recommendations. It is also important to note that some of the commands are slightly different in newer versions of gpg, and I have adjusted my commands below to work with the Gpg4Win version I mentioned in Prerequisites.
We're going to be generating a master key that is only used for certifying subkeys, whereas the default is to have master keys that can sign data as well as certify subkeys. For example my Keybase master key has data signing capabilities as well as subkey certification capabilities as you can see from the output of gpg --list-secret-keys:
sec rsa2048 2014-04-06 [SC]
where the [SC] stands for data Signing and subkey Certification
To start the key generation process, run the following command:
gpg --expert --full-generate-key
First you will be asked to select the type of key to generate:
gpg (GnuPG) 2.2.8; Copyright (C) 2018 Free Software Foundation, Inc.
This is free software: you are free to change and redistribute it.
There is NO WARRANTY, to the extent permitted by law.

Please select what kind of key you want:
   (1) RSA and RSA (default)
   (2) DSA and Elgamal
   (3) DSA (sign only)
   (4) RSA (sign only)
   (7) DSA (set your own capabilities)
   (8) RSA (set your own capabilities)
   (9) ECC and ECC
  (10) ECC (sign only)
  (11) ECC (set your own capabilities)
  (13) Existing key
Your selection?
Select option 8 (RSA w/set your own capabilities) so that we can specify what actions are permitted with our master key. By default, all actions will be allowed with the master key, so we want to toggle the sign and encrypt capabilities off:
Possible actions for a RSA key: Sign Certify Encrypt Authenticate
Current allowed actions: Sign Certify Encrypt

   (S) Toggle the sign capability
   (E) Toggle the encrypt capability
   (A) Toggle the authenticate capability
   (Q) Finished

Your selection? s

Possible actions for a RSA key: Sign Certify Encrypt Authenticate
Current allowed actions: Certify Encrypt

   (S) Toggle the sign capability
   (E) Toggle the encrypt capability
   (A) Toggle the authenticate capability
   (Q) Finished

Your selection? e

Possible actions for a RSA key: Sign Certify Encrypt Authenticate
Current allowed actions: Certify

   (S) Toggle the sign capability
   (E) Toggle the encrypt capability
   (A) Toggle the authenticate capability
   (Q) Finished

Your selection? q
Next, we will choose our key size. If you are using a Yubikey 4 you can use 4096, otherwise use 2048 (the default).
RSA keys may be between 1024 and 4096 bits long.
What keysize do you want? (2048) 4096
Requested keysize is 4096 bits
Next choose how long you want your master key to be valid for. I like to give it a decent timeframe like 5 years but you may want shorter or longer expiry depending on your personal preference:
Please specify how long the key should be valid.
         0 = key does not expire
      <n>  = key expires in n days
      <n>w = key expires in n weeks
      <n>m = key expires in n months
      <n>y = key expires in n years
Key is valid for? (0) 5y
Key expires at 08/30/23 14:45:38 Eastern Daylight Time
Is this correct? (y/N) y
Finally you will be asked to add your name, email address, and a comment (if you want):
GnuPG needs to construct a user ID to identify your key.

Real name: Thracky Spackoid
Email address: thracky@example.com
Comment:
You selected this USER-ID:
    "Thracky Spackoid <thracky@example.com>"

Change (N)ame, (C)omment, (E)mail or (O)kay/(Q)uit? O
You will then be prompted to provide a passphrase to protect the master key, and now your master key is generated! You'll see the full fingerprint of the key printed out, which you will want to keep handy. In general you can also reference your key with the last 8 characters of your fingerprint.
public and secret key created and signed.

pub   rsa4096 2018-09-02 [C] [expires: 2023-09-01]
      42B1E8B9B6E3953873EAD4815C3C5228CE6DAD42
uid                      Thracky Spackoid <thracky@example.com>
So in this case, we can reference the key using CE6DAD42
Revocation certificate
As recommended in Eric Severance's post, we definitely want to create a revocation certificate just in case something goes wrong with your master key (e.g. you lose it or forget the passphrase) so let's go ahead and do that with the gpg command line once again:
 gpg --gen-revoke CE6DAD42 > CE6DAD42-revocation.asc

sec  rsa4096/5C3C5228CE6DAD42 2018-09-02 Thracky Spackoid <thracky@example.com>

Create a revocation certificate for this key? (y/N) y
Please select the reason for the revocation:
  0 = No reason specified
  1 = Key has been compromised
  2 = Key is superseded
  3 = Key is no longer used
  Q = Cancel
(Probably you want to select 1 here)
Your decision? 3
Enter an optional description; end it with an empty line:
>
Reason for revocation: Key is no longer used
(No description given)
Is this okay? (y/N) y
ASCII armored output forced.
Revocation certificate created.

Please move it to a medium which you can hide away; if Mallory gets
access to this certificate he can use it to make your key unusable.
It is smart to print this certificate and store it away, just in case
your media become unreadable.  But have some caution:  The print system of
your machine might store the data and make it available to others!
Now you have your revocation certificate as well. It's important to store this somewhere safe, like a USB flash drive in a fire safe or print it out and keep it in a safety deposit box, but make sure you store it separately from where you eventually keep your master key.
The subkeys
Now that we have our master key and our revocation "safety net", we need to generate subkeys for encryption, signing, and authentication. In the past it made sense to perform generation of the signing and authentication subkeys directly on the Yubikey, since these keys would be unique to each Yubikey, but this creates 2048 bit keys. If you're using a Yubikey 4 as I am, you may want to perform the generation locally and copy the keys to the card. For the sake of completeness I will show both options.
The encryption subkey
We prefer to generate the encryption subkey locally regardless of how you want to generate the other keys. For this we will use the command gpg --edit-key <fingerprint> and use the addkey command, noting that the same rules apply as above for keysize (4096 bits for yubikey 4, 2048 for NEO):
gpg --edit-key CE6DAD42
gpg (GnuPG) 2.2.10; Copyright (C) 2018 Free Software Foundation, Inc.
This is free software: you are free to change and redistribute it.
There is NO WARRANTY, to the extent permitted by law.

Secret key is available.

sec  rsa4096/5C3C5228CE6DAD42
     created: 2018-09-02  expires: 2023-09-01  usage: C
     trust: ultimate      validity: ultimate
[ultimate] (1). Thracky Spackoid <thracky@suchsecurity.com>

gpg> addkey
Please select what kind of key you want:
   (3) DSA (sign only)
   (4) RSA (sign only)
   (5) Elgamal (encrypt only)
   (6) RSA (encrypt only)
Your selection? 6
We only want to create an encryption key so select option 6. Then you'll set the key size, and expiry time as before.
RSA keys may be between 1024 and 4096 bits long.
What keysize do you want? (2048) 4096
Requested keysize is 4096 bits
Please specify how long the key should be valid.
         0 = key does not expire
      <n>  = key expires in n days
      <n>w = key expires in n weeks
      <n>m = key expires in n months
      <n>y = key expires in n years
Key is valid for? (0) 5y
Key expires at 09/01/23 09:20:46 Eastern Daylight Time
Is this correct? (y/N) y
Really create? (y/N) y
We need to generate a lot of random bytes. It is a good idea to perform
some other action (type on the keyboard, move the mouse, utilize the
disks) during the prime generation; this gives the random number
generator a better chance to gain enough entropy.
Now we've got our encryption subkey, which can be identified by the "ssb" on the leftmost column, and the "E" listed for usage.
sec  rsa4096/5C3C5228CE6DAD42
     created: 2018-09-02  expires: 2023-09-01  usage: C
     trust: ultimate      validity: ultimate
ssb  rsa4096/11FA914BF1D9D06B
     created: 2018-09-02  expires: 2023-09-01  usage: E
[ultimate] (1). Thracky Spackoid <thracky@example.com>
Now let's back up our keys quickly, as importing the encryption key to the Yubikey will remove it from the GPG keyring. This is done with the command gpg --output <desired filename>.pgp --export-secret-key <fingerprint> A small warning here, if you decide to pipe output instead of using the --output argument, make sure you ONLY do this in the standard command prompt and NOT Powershell. Powershell will screw up your export badly
The signing and authentication subkeys
First let's look at generating the signing and authentication subkeys directly on the Yubikey.
Generation on the Yubikey
We'll start the signing and authentication subkey creation the same way we did for the encryption subkey, with gpg --edit-key, and at the gpg prompt will use the addcardkey command:
gpg> addcardkey
Signature key ....: [none]
Encryption key....: [none]
Authentication key: [none]

Please select the type of key to generate:
   (1) Signature key
   (2) Encryption key
   (3) Authentication key
Your selection? 1
Once you select "Signature key", you will be prompted for a PIN on your Yubikey. By default the PIN is 123456, which we will change later.
Once you select the expiry, you will be prompted for the Admin PIN on your Yubikey which is 12345678 by default. Again, we will change this later.
We're now going to repeat the process, but for our Authentication key. Note that it is normal to not be asked for your Yubikey PINs again, as they will be cached.
gpg> addcardkey
Signature key ....: 37E6 1FBC 2022 A06C 9EB7  E91A D7EE 5978 3BC0 CA88
Encryption key....: [none]
Authentication key: [none]

Please select the type of key to generate:
   (1) Signature key
   (2) Encryption key
   (3) Authentication key
Your selection? 3
Please specify how long the key should be valid.
         0 = key does not expire
      <n>  = key expires in n days
      <n>w = key expires in n weeks
      <n>m = key expires in n months
      <n>y = key expires in n years
Key is valid for? (0) 5y
Key expires at 09/01/23 09:41:09 Eastern Daylight Time
Is this correct? (y/N) y
Really create? (y/N) y
If you refresh your Kleopatra Smartcard dialog, you should now see fingerprints for your signature and authentication keys like this:
Local generation
Local generation is almost exactly like how we generated the encryption subkey above, except you will only be able to perform addkey for the signature key without using the "expert" command. For the signature key, follow the instructions above for the encryption key, but select 4 for the key type which corresponds to "RSA (sign only)"
For the authentication key we need to run gpg --expert --edit-key <fingerprint> and when we perform addkey we will need to toggle the capabilities so only authentication is selected:
gpg> addkey
Please select what kind of key you want:
   (3) DSA (sign only)
   (4) RSA (sign only)
   (5) Elgamal (encrypt only)
   (6) RSA (encrypt only)
   (7) DSA (set your own capabilities)
   (8) RSA (set your own capabilities)
  (10) ECC (sign only)
  (11) ECC (set your own capabilities)
  (12) ECC (encrypt only)
  (13) Existing key
Your selection? 8

Possible actions for a RSA key: Sign Encrypt Authenticate
Current allowed actions: Sign Encrypt

   (S) Toggle the sign capability
   (E) Toggle the encrypt capability
   (A) Toggle the authenticate capability
   (Q) Finished

Your selection? a

Possible actions for a RSA key: Sign Encrypt Authenticate
Current allowed actions: Sign Encrypt Authenticate

   (S) Toggle the sign capability
   (E) Toggle the encrypt capability
   (A) Toggle the authenticate capability
   (Q) Finished

Your selection? s

Possible actions for a RSA key: Sign Encrypt Authenticate
Current allowed actions: Encrypt Authenticate

   (S) Toggle the sign capability
   (E) Toggle the encrypt capability
   (A) Toggle the authenticate capability
   (Q) Finished

Your selection? e

Possible actions for a RSA key: Sign Encrypt Authenticate
Current allowed actions: Authenticate

   (S) Toggle the sign capability
   (E) Toggle the encrypt capability
   (A) Toggle the authenticate capability
   (Q) Finished
Your selection? q
All the other options are the same as before.
Now we need to get the keys onto the Yubikey so we're in the same place as we would be if we generated the keys directly on it. We use the keytocard command for this. First we need to select the desired subkey. You can list your keys using the list command:
gpg> list

sec  rsa4096/5C3C5228CE6DAD42
     created: 2018-09-02  expires: 2023-09-01  usage: C
     trust: ultimate      validity: ultimate
ssb  rsa4096/11FA914BF1D9D06B
     created: 2018-09-02  expires: 2023-09-01  usage: E
ssb  rsa4096/88EB1FD67DAB976C
     created: 2018-09-02  expires: 2023-09-01  usage: S
ssb  rsa4096/CB6C33FD2EFC72A1
     created: 2018-09-02  expires: 2023-09-01  usage: A
In order to select our signature key to be copied in this case, we use the command key 2. You'll see the * symbol beside the key you have selected.
sec  rsa4096/5C3C5228CE6DAD42
     created: 2018-09-02  expires: 2023-09-01  usage: C
     trust: ultimate      validity: ultimate
ssb  rsa4096/11FA914BF1D9D06B
     created: 2018-09-02  expires: 2023-09-01  usage: E
ssb* rsa4096/88EB1FD67DAB976C
     created: 2018-09-02  expires: 2023-09-01  usage: S
ssb  rsa4096/CB6C33FD2EFC72A1
     created: 2018-09-02  expires: 2023-09-01  usage: A
Now we use keytocard to copy this key to the Yubikey, making sure we select "Signature key" for where to put the key:
gpg> keytocard
Please select where to store the key:
   (1) Signature key
   (3) Authentication key
Your selection? 1
You'll need to provide the Yubikey PINs, which are "123456" for the regular PIN, and "12345678" for the admin PIN. It's usually quite clear when it's asking for the Admin pin, so if it doesn't say "Admin PIN" in the request, use the regular PIN. We will change these later.
Now we will copy the authentication key. Toggle off the signature key selection by using key 2 then toggle selection of the authentication key with key 3. Now perform keytocard again, selecting authentication key as where to store the key.
And now we are at the same place as if we generated the keys directly on the Yubikey, except if you have a Yubikey 4 you now have 4096 bit keys instead of 2048 bit keys.
Copying the encryption subkey
Regardless of how you generated the signature and auth subkeys, you'll need to copy the encryption subkey over by selecting your encryption key (probably key 1) then use the keytocard command, using the same process as above if you generated the other subkeys locally.
gpg> key 1

sec  rsa4096/5C3C5228CE6DAD42
     created: 2018-09-02  expires: 2023-09-01  usage: C
     trust: ultimate      validity: ultimate
ssb* rsa4096/11FA914BF1D9D06B
     created: 2018-09-02  expires: 2023-09-01  usage: E
ssb  rsa4096/88EB1FD67DAB976C
     created: 2018-09-02  expires: 2023-09-01  usage: S
ssb  rsa4096/CB6C33FD2EFC72A1
     created: 2018-09-02  expires: 2023-09-01  usage: A
[ultimate] (1). Thracky Spackoid <thracky@suchsecurity.com>

gpg> keytocard
Please select where to store the key:
   (2) Encryption key
Your selection? 2
Distributing your public key
I won't get into dirty details on how to distribute your public key, but if you use keybase, your public key is available at https://keybase.io/<username>/key.asc. Otherwise, you can either put your public key on your website or to a keyserver. You can also add your preferred keyserver into your key by running gpg --edit-key <fingerprint> once again then using the keyserver command.
Then you can export the public key with gpg --armor --export <fingerprint> --output whatever.asc and copy the resulting file to your webserver or you can upload to a keyserver using the --send-key command line argument.
Step 2.5 - Finishing the Yubikey PGP setup
We now need to do a few housekeeping things with the Yubikey. First off, assuming your public key is uploaded somewhere, and your master key is safely backed up somewhere, you can remove the master and subkeys from your main system via Kleopatra.
Next, we need to change the password on the card and pull our public key back into our local keychain. For this we will use gpg --edit-card and need to start by enabling admin commands:
gpg/card> admin
Admin commands are allowed
Now let's change the PIN and Admin PIN, which must be a minimum of 6 and 8 digits respectively:
gpg/card> passwd
gpg: OpenPGP card no. D2760001240102010006050109960000 detected

1 - change PIN
2 - unblock PIN
3 - change Admin PIN
4 - set the Reset Code
Q - quit

Your selection? 1
PIN changed.

1 - change PIN
2 - unblock PIN
3 - change Admin PIN
4 - set the Reset Code
Q - quit

Your selection? 3
PIN changed.

1 - change PIN
2 - unblock PIN
3 - change Admin PIN
4 - set the Reset Code
Q - quit

Your selection? q
Now to force PIN entry for signing, set the publicly available URL for the public key, and fetch the public key back into our keyring:
gpg/card> forcesig

gpg/card> url
URL to retrieve public key: https://suchsecurity.com/pgp/blah.asc
Now in theory you should be able to just run the fetch command and download the public key, but for whatever reason this never works for me on Windows. So you can just download the public key manually, and select Import in Kleopatra. On Linux/macOS, fetch seems to work without issue.
Step 3 - SSH
Finally now for the fun part. For now, I will only be explaining how to get your SSH public key in Cygwin until I figure out a decent way to do this in PuTTY. First, we need to go to Kleopatra and go to Settings then Configure Kleopatra and go to GnuPG System then the Private Keys tab. Enable pageant agent support by checking Enable putty support. You will probably need to exit Kleopatra and kill the gpg-agent process. Start Kleopatra back up and make sure your Yubikey is showing up properly.
Next, you will want to make sure that you have the ssh-pageant package installed in Cygwin, and then add the following to your shell startup scripts:
eval $(/usr/bin/ssh-pageant -r -a "/tmp/.ssh-pageant-$USERNAME")
In addition, make sure you are not using any other ssh-agent.
Next, fire up a terminal and grab your public key associated with your PGP key with ssh-add -L. If everything worked, you'll see a public key with a comment of "cardno:xxxxxxxxx:", which you can add to your authorized_keys on remote systems. The first time you log in each time you plug in your Yubikey, you will have to enter the PIN.
Step 3.5 - Require touch for SSH auth
One extra level of protection the Yubikey offers is that you can require a physical touch on the Yubikey in order to perform PGP operations, including SSH authentication. In order to do this, grab the Yubikey Manager and run the following ykman commands:
ykman openpgp touch aut on
ykman openpgp touch sig on
ykman openpgp touch enc on
The Yubikey will blink when you attempt to SSH using the key stored on the Yubikey, and you will just need to touch it to continue the auth process.
Well that about does it. As usual, if you have any questions or problems, reach out to me on Twitter @thracky